
Man, Web3 and crypto wallets are blowing up lately! It seems like every day some new decentralized app or digital wallet is hitting the scene. As a crypto enthusiast, it’s hard to keep up with all the options out there for managing my digital assets.
That’s why I was psyched to hear about the newly launched Binance Web3 Wallet. Binance is a name I already know and trust, so I’m eager to learn if their wallet solution can simplify my Web3 experiences.
Let’s dive in and see what makes the Binance Web3 Wallet tick!
What is Binance Web3 Wallet?
The Binance Web3 Wallet is a slick new crypto wallet feature within the main Binance app. So it provides a one-stop shop to buy, sell, trade AND self-custody your crypto. No more toggling between exchanges and external wallets!
This wallet opens up easy access to all sorts of trendy decentralized apps and services powered by different blockchains. No more missing out on hot new DeFi platforms because I don’t hold the right crypto or have the right wallet!
Binance also uses advanced tech called multi-party computation to beef up security. I don’t fully understand how MPC works, but basically, it distributes keys so no one party has full control. Your assets stay ultra secure!
And I love how the Web3 Wallet gives users more control by dividing up the private keys. I can rest easy knowing my keys are safely distributed across multiple places, not just sitting on one exchange server somewhere.
So all in all, the Binance Web3 Wallet offers me the perfect blend of convenience, DeFi access, and personal control. This might become my new go-to crypto wallet!
Key Features of Binance Web3 Wallet
Okay, let’s dig into some of the key features that make the Binance Web3 Wallet so useful!
First up – it’s crazy simple to set up the wallet directly in the Binance app. No need to download a bunch of extensions or set up new accounts. Just tap and create! This makes getting started with Web3 a breeze.
I also love how convenient it is to swap tokens and earn yields on my crypto, all within the Web3 Wallet interface. No more hopping around to different DEXs and platforms. It’s a one-stop shop for DeFi!
And of course, security is critical when choosing a crypto wallet. Binance Web3 has me covered with protections like MPC and built-in scam checks. I’ll get warnings if I ever try sending to a shady-looking address.
The distributed private keys also give me confidence my assets are truly in my control. I’m not just trusting Binance’s word – I hold the keys to my kingdom!
Lastly, 24/7 customer support brings some serious peace of mind. I can get help anytime something goes wrong or I have questions.
Read also! Best Bitcoin Wallet in Ghana
How to Create and Use Binance Web3 Wallet
Creating a Web3 Wallet is super quick:
- Log into my Binance app
- Tap “Wallets”, then “Web3 Wallet”
- Hit “Create Wallet” and I’m good to go!
Once my wallet is set up, I need to back it up with a recovery password. This lets me restore it if I ever switch devices.
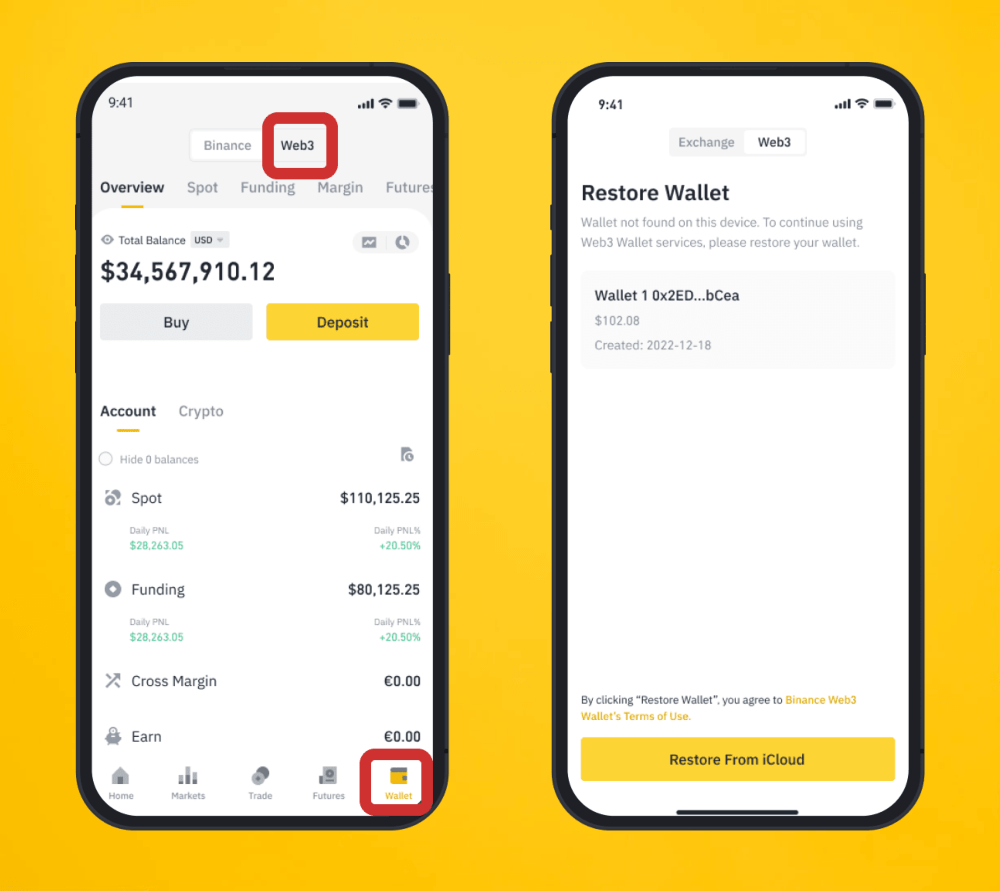
Restoring is easy – I just log into my Binance app on the new device, tap Wallets > Web3 Wallet, and enter my recovery password. My wallet is restored and ready to use!
I also dig the “Emergency Export” feature. This lets me retrieve my private keys independently if I ever lose access to my Binance account. Crypto self-custody gives me that control!
Sending and Receiving Crypto
Let’s now walk you through the process of sending and receiving tokens.
Transferring Funds Between Exchange and Web3 Wallets
Before you can start sending and receiving tokens, you need to move your assets between your Binance exchange wallet and your Web3 Wallet. It’s like transferring money between your checking and savings accounts. Here’s how:
- Log in to your Binance app: Open the Binance app and click on the “Wallets” tab. From there, navigate to “Web3.”

Source: Binance - Sending Tokens from Your Exchange Wallet to Your Web3 Wallet:
- Tap “Receive” and select “Transfer Now” on your Web3 Wallet homepage.
- Choose the token you want to transfer and the network.
- Enter the transfer amount, and you’ll see the network fee.
- Decide whether you want to send from your Spot or Funding Wallet and click “Withdraw.”
- Double-check the transfer details, ensuring the address and network are correct. Remember, once confirmed, transactions cannot be canceled. Tap “Confirm” to process your transaction.
- Sending Tokens from Your Web3 Wallet to Your Exchange Wallet:
- Tap “Send” and choose “Transfer Now” on your Web3 Wallet homepage.
- Select the token and enter the transfer amount. Make sure your Web3 Wallet balance covers the gas fees.
Transferring funds is pretty straightforward, but the next part is even more exciting – sending tokens to external wallets or recipients.
Sending Tokens to External Wallets or Recipients
- To send tokens from your Binance Web3 Wallet:
- Tap “Send” or “Transfer Now” on the Web3 Wallet homepage.
- Paste the recipient’s address and click “Continue.”
- If the address raises red flags for potential scams, you’ll receive a warning message. You have two choices:
- “Stop and Cancel” the transfer, ensuring your assets remain safe.
- “Continue” with the transfer, acknowledging that your assets might be lost if the recipient is not trustworthy.
- Enter the amount you wish to send and tap “Review Send.”
- Double-check all the details before you tap “Confirm.”
- Sit back and relax while your transaction processes. It may take a little time, but your funds will be on their way.
Receiving Tokens Through QR Codes or Addresses
Receiving tokens can be just as important as sending them, especially when you’re expecting crypto from friends or partners. Here’s how you can do it:
- On your Web3 Wallet homepage, tap “Receive.”
- Choose the token you wish to receive.
- You’ll see a QR code and the token address. You can use the copy or share icon to provide this information to the sender.
- Always take note of the address’s network to ensure your funds end up where they belong.
Whether I’m funding my trading account, paying a friend, or receiving payments – the Web3 Wallet makes managing crypto transfers a totally headache-free experience. Just the kind of simplicity I need to navigate between the decentralized future seamlessly!
Read also! Binance Crypto Exchange Review
Conclusion
Whew, we covered a lot of ground! To recap, the Binance Web3 Wallet brings awesome features like:
- Beefed up security from MPC technology
- Ability to self-custody keys for more control
- Quick access to DeFi apps to swap tokens and earn yields
- Seamless transfers between the wallet and main exchange
With convenience, control, and cutting-edge tech in one place, the Binance Web3 Wallet has huge potential to simplify and secure my crypto world. I’m pumped to see where they take it in the evolving DeFi landscape.
The bottom line – if you want an easy fuss-free gateway to explore Web3 and DeFi, the Binance Web3 Wallet should be on your radar! Thanks for learning about it with me.
FAQs
- What is the Binance Web3 Wallet?
The Binance Web3 Wallet is a crypto wallet feature within the Binance app. It allows users to easily manage, send, and receive cryptocurrencies while connecting to decentralized apps and services.
- What are the main benefits of the Web3 Wallet?
- Simple set up directly in the Binance app
- Convenient swapping and yield generating from one place
- Enhanced security through MPC technology
- Maintains user control via distributed private keys
- Is the Web3 Wallet self-custody?
Yes, you fully control your own crypto assets and are responsible for security.
- How do I access the Web3 Wallet?
Log into your Binance app, go to Wallets > Web3 Wallet, and click “Create Wallet” to get started.
- How do I send and receive crypto with the Web3 Wallet?
To send – enter the recipient’s address, specify amount, and confirm the transfer. To receive – share your QR code or wallet address with the sender.
- Are there fees to use the Web3 Wallet?
Transactions incur standard network fees, also called gas fees, to process on the blockchain. Fees vary across networks.
- Do I need to back up the Web3 Wallet?
Yes, be sure to back up your wallet by protecting your cloud key share with a recovery password. This allows restoration if needed.
- Can I restore the Web3 Wallet on a new device?
Yes, just log into your Binance app and enter your recovery password to restore your wallet.
- Can I export private keys from the Web3 Wallet?
You can use the “Emergency Export” function to export private keys, but your Web3 Wallet will then become unavailable.